Thursday, June 5, 2014

Maxx Genx Droid7 AX352 Pattern Lock Remove Solution

Maxx Genx Droid7 AX352 Pattern Lock Remove Solution
How To Hard Reset Maxx Genx Droid7 AX352
Maxx AX352 Pattern Lock Solution
Maxx AX352 Factory Reset

How To Hard Reset:

1.Power Off Your Phone
2.Press Together Volume Up + Home+Power
Button Until Android Logo Appears
4.Choose "wipe Data/factory Reset" With
Volume Buttons And Select With Power Button
5.Choose "yes" With Volume Buttons And Select
It With Power Button
6.Wait Until Format Ends
7.Select "reboot" And Press Power Button To
Confirm
8.Wait Until The Phone Restarts

Key Features:

Android v2.3.6 (Gingerbread)
3.5 Inch, 320x480 px display, TFT
Single core 1000 MHz processor
2 MP Primary Camera, 0.3 MP Secondary
WiFi
32 GB Expandable
256 MB RAM
1300 mAh, Li-Ion battery

Gaurav-Mobile

How To Hard Reset Samsung I8552 Galaxy Grand Quattro

How To Hard Reset Samsung I8552
How To Remove Pattern Lock From Samsung
I8552
Samsung I8552 Galaxy Grand Quattro Hard Reset Solution
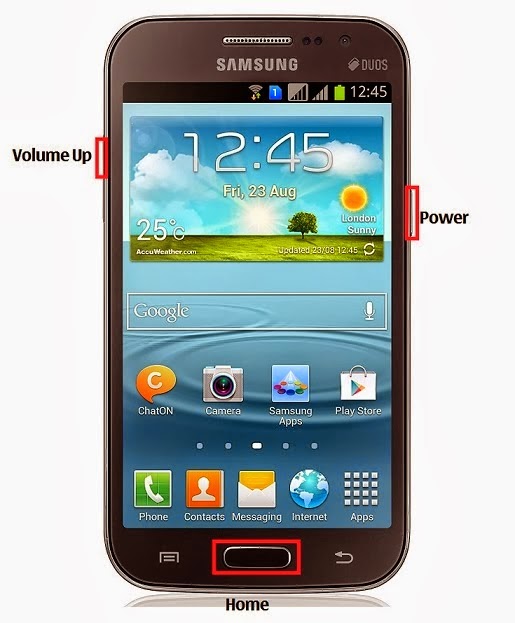
Samsung Galaxy Win I8550 Pattern Lock Solution
Samsung Galaxy Grand Quattro Format
Samsung Galaxy Win I8550 Hard Reset

"Hard Reset", Also Known As Restore Factory
Settings, Is A Method Of Reverting All The
Phone'S Settings To It'S Factory Default. You
May Reset Your Phone Either The "Hard" Way
(Which Resets The Phone And Deletes Your
Personal Settings) Or The "Soft" Way (Which
Resets The Phone But Keeps Your Personal
Settings. Remove The SIM Card And Memory Card First.

How To Reset:

1.Power Off Your Phone
2.Press Together Volume Up + Home
3.Keep Pressing These 2 Buttons + Press Power
Button For 2-3 Seconds.
4.Release Only Power Button, But KEEP
Pressing Volume Up + Home Buttons
5.Choose "wipe Data/factory Reset" With
Volume Buttons And Select With Power Button
5.Choose "yes" With Volume Buttons And Select
It With Power Button
6.Wait Until Format Ends
7.Select "reboot" And Press Power Button To
Confirm
8.Wait Until The Phone Restarts

Key Features:

Powerful Performance
Easy Mode
Motion UI- Smart Alert
Shake to Update
Turn Over to Mute
5 MP Primary Camera
ChatON
Dual SIM (GSM + GSM)

Gaurav-Mobile

Final Solution For Remove Pattern Lock From Samsung S7262 Galaxy Star Pro

Final Solution For Remove Pattern Lock From
Samsung S7262 Galaxy Star Pro
Samsung S7262 Hard Reset Solution
How To Hard Reset Samsung S7262
Samsung S7262 Patter LOck Remove

Follow these steps-

1.Download CSC.zip file for your device and
extract to desktop.
2.Put your phone in download mode. To do so
turn it off completely, now turn it on by
pressing and holding Volume Down + Home
Button + Power Key, once you see the warning,
press Volume Up to continue.
3.Open Odin3.exe
4.Connect your device to your PC now. The
ID:COM box in Odin should turn blue now. This
indicates that your device is properly connected
in download mode.
5.Click on the CSC tab in odin and select the
CSC.tar.zip file.
6.Once the file is loaded, click on start.
The flashing process will start and end quickly
indicating “Reset or Pass” in Odin and your
device will reboot.
7.Boot into recovery now select wipe/ data reset

Gaurav-Mobile

Lg E405 Hard Reset And Pattern Lock Solution

Lg E405 Hard Reset And Pattern Lock Solution
How To Hard Reset Lg L3 E405
Lg E405 Pattern Lock Solution
Lg E405 Hard Reset Solution

How To Reset:

In Power Off Condition, Press & Hold "Home"+
"Power" + "Volume Down" Keys For About 10
Seconds.
When Screen Shows Lg Logo, Release The
"Power" Key, Do Not Release Other Keys Till
Hard Reset Screen Is Displayed.
When Hard Reset Screen Is Displayed, Release
All Keys.
Leave The Phone For About A Minute, Until It
Performs Hard Reset & Reboots.
LG optimus L3 E405 Mobile

Technical
Specifications:

Quad Band GSM/EDGE, 3G
3.2″ inch (240×320 pixels) Capacitive
Touchscreen
3.2 Megapixel Camera + Auto Focus + Geo-
tagging
ARM 800 MHZ Processor + Adreno 200 graphics
384MB RAM
1GB Internal Memory + Micro SD Card Slot (2GB
Included)
Wi-Fi 802.11 b/g/n + Hotspot + Bluetooth + GPS
Stereo FM Radio + 3.5mm Audio jack
1500 mAh Li-Ion battery
Talktime up to 10 Hours on 3G
Standby Time up to 909 Hours on 3G
Dimensions: 61.6 x 102.6 x 11.85 mm
Weight: 108 gm

LG Optimus L3 E400 Hard Reset Solution

LG Optimus L3 E400 Hard Reset Solution
How To Hard Reset LG Optimus L3 E400
LG E400 Pattern Lock Solution

How To Reset:

In Power Off Condition, Press & Hold "Volume
Down"+ "Home" + "Power" Release Button After
3-4 Seconds.
When Screen Shows Lg Logo, Release The
"Power" Key, Do Not Release Other Keys Till
Hard Reset Screen Is Displayed.
When Hard Reset Screen Is Displayed, Release
All Keys.
Leave The Phone For About A Minute, Until It
Performs Hard Reset & Reboots.

Key Features-

Android v2.3 (Gingerbread) OS
3 MP Primary Camera
3.2-inch TFT LCD Capacitive Touchscreen
800 MHz Processor
FM Radio
Wi-Fi Enabled
Expandable Storage Capacity of 32 GB

LG Optimus L5 E610 Hard Reset Solution Keys

LG Optimus L5 E610 Hard Reset Solution Keys
LG E610 Hard Reset Solution
How To Hard Reset LG Optimus L5 E610
LG Optimus L5 E610 Factory Reset

How To Hard Reset:
When The Phone Is Switched Off, Press And Hold
The Volume Down Key + Power Key With Your
Left Hand.
When The Led On The Bottom Of The Phone
Lights Up, Release Volume Down Key + Power
Keys And Press And Hold The Home Key (For
About 2 Seconds) At The Same Time.
The Phone Will Turn On And Perform A Factory
Reset Immediately.
Do Not Operate Your Phone For At Least A
Minute, While The Hard Reset Is Carried Out.
You Will Then Be Able To Switch Your Phone
Back On.
If You Perform A Hard Reset, All User
Applications, User Data And Drm Licences Will
Be Deleted. Please
Remember To Back Up Any Important Data
Before Performing A Hard Reset.
How To Reset Lg Optimus L5 Hard Reset
To Reset Your Lg Optimus L5 Hard Reset Phone
To Factory Settings And Erase All The Data On
Your Phone, Select Settings → Back Up And
Reset→ Factory Data Reset → Reset Device→
Delete All.
Resetting The Andorid Phone Does Not Erase Any
System Software Updates You Have Downloaded
Or Any Files On Your Microsd Card, Such As
Music Or Photos. If You Reset The Phone In This
Way, You Are Prompted To Re-Enter The Same
Information That You Did When You First Started
Android.

How To Make Modified Android Boot + NokiaUSB Flashing Cable

How To Make Modified Android Boot + Nokia USB Flashing Cable
Make Android Boot Cable Solution
How To Make Nokia Usb Boot Cable
How To Make Modified Android Boot + Nokia USB Flashing Cable

How To Make Modified Android Boot + Nokia
USB Flashing Cable
Before To Write Someting I Want To Tell You One
Thing. What Economics Says? Okay I Want To
Tell You Here, Human Can Not Made Any Thing
Itself. They Just Can Modified From One Thing
To Another Like: Carpenter Did Not Make
Furniture (Chair, Table) But In Fact Carpenter
Just Changed The Form Of Wood To Chair. So,
He Did Not Make That. Just Change The Form
One To Another. So, This Is Super Modified
Cable Never Make Before.
These Days, Many Android Devices Are
Appearing In The Market. So, We Think This Is
Also Challenging Job To The Technician To Get
Success In Android Devices. We Are In Chinese
Section So We Think For Chinese Devices. May
Be This Cable Will Also Work For Original.

Why We Need 4 In 1 Cable?
Because In Market We See V3, 8600, Iphone4
And Iphone5 Types Of Android Devices Much.

Why Switch In The 4 In 1 Cable?
Sometimes, We Don'T Need Vcc Especially To
Repair Imei Of Android Device So, When No
Need, Then, You Can Switch Off The Vcc As
Shown In The Picture.

Why 5310 Type Power Cable And Others Type
Here:
Sometimes Vcc Or Bsi Point Has Broken From
The Charging Socket Or Earphone Socket Or Usb
Socket, So We Have Added This Link To The
Power Cable. And, It Is Very Hard To Fix The
Other Type Of Power Cable So We Have Added
5310 Type Here.
Now, You Can Work With This Cable With Nokia
And Such Type Phone To Flash From Usb.

With This Cable:
1. You Can Bring The Nokia Local Mode So That
You Can Flash The Nokia Device From Usb
Method Because This Cable Is Inbuilt Resistance
To Bring The Device To The Local Mode.
2. You Can Also Flash The Android Devices
Because Empty-Places Occupied And Joined To
Gnd So That There Is No Need To Install Battery
At The Flashing Time.
3. We Have Switch Of Vcc So That When The
Device Doesn'T Need Vcc, Then, You Can Off Vcc
From The Switch.
4. We Think Future Technology, So We Also Not
Only Think 8600, V3 Types But Also We Think
Iphone 4 And Iphone 5 Cables Types On It So
That Future Model Can Easily Do With This
Cable.
5. You Can Repair Android Imei Easily.
6. If Your Devics Has Broken Point In Of Vcc
From The Socket (Charging, Earphone Or Usb
Socket), You Can Also Repair Your Device
Because This Cable Has Given Extra Vcc From
The Wire, Not Only Vcc But Also Bsi And Gnd. I
Think, Users Can Understand This.
7. As Users Know That 8600 Types Battery
Socket Is Different Type And It It Difficulty To
Give Powre From Cable Because At The Time Of
Operation Cable Can Unplug And Device Can Be
Dead So We Have Added Battery Cable For This
Type Also.
8. No, Need Buy More Cables And So You Can
Save Money Just Buying It.
9. No Need To But And Cut Cables For Different
Types Of Mobile That Saving Your Time And
Money Also.

How To Hard Reset Remove Pattern Lock FromSony Xperia M C1905

How To Hard Reset Remove Pattern Lock From Sony Xperia M C1905
Sony Xperia M C1905 Hard Reset Solution
How To Hard Reset Sony Xperia M C1905
Sony Xperia M C1905 Pattern Lock Solution
How To Hard Reset:
1.Open Sony Pc Companion
2.Power Off Your Phone
3.Connect Microusb Cable To Your Computer
4.Click On "Phone /Tablet Software Update"
5.Click On "Repair My Phone/Tablet"
6.Select Sony Xperia M
7.Press Volume Down And Connect Your Phone
To Microusb Cable When Software Ask
8.Wait Until Update Is Complete
9.Disconnect Your Phone From Cable And Power
On
10.Wait Until Phone Restarts

Specification:
4" Multitouch TFT Capacitve Touchscreen in
Scratch Resistant Glass
Android 4.1 Jelly Bean
1 GHz Krait Dual-core Qualcomm Snapdragon S4
Plus
5.0MP Camera with LED Flash
VGA Front Camera
4GB Internal (Expandable to 32GB in MicroSD),
1GB RAM
Li-Ion 1750mAh battery

Huawei Ascend G740 Hard Reset Solution Keys

Huawei Ascend G740 Hard Reset Solution Keys
How To Remove Pattern Lock From Huawei Ascend G740
Huawei Ascend G740 Hard Reset Solution
How To Hard Reset Huawei G740 How To Hard Reset:

Remember! All Data Will Be Lost! Do This At
Your Own Risk!
1.Power Off Your Phone
2.Press Together Volume Up + Power Button
3.Select With Volume Buttons "Wipe Data/
Factory Reset" And Press Power To Confirm
4.Select "Yes" And Press Power To Confirm
5.Wait Until You See "Ok" On Screen
6.Press Power Key To Confirm "Reboot"
7.Wait Until The Phone Restarts
Done :)

Product Features:
3G, Wi-Fi
Dual Core, 1.2 GHz Processor
1 GB RAM
8 GB inbuilt memory
5 inches, 720 x 1280 px display
8 MP Camera with flash
Memory Card Supported, upto 32 GB
Android, v4.1.2

Motorola RAZR i XT890 Hard Reset SolutionRemove Pattern Lock

Motorola RAZR i XT890 Hard Reset Solution Remove Pattern Lock
How To Hard Reset Motorola XT890
Motorola RAZR i XT890 Pattern Lock Remove
Motorola XT890 Factory Reset Keys

Factory Reset On Razr I - Xt890
1) Ensure The Handset Is Powered Off
2) Hold Down The Vol Down And Press The
Power On Key
The Phone Will Power Up In Fastboot Flash
Mode
3) Press The Down Vol Until "Recovery" Is
Highlighted, Then Press The Vol Up Key To
Select.
A Picture Of An Android Will Appear In The
Screen Witha "!" Symbol
4) Press Vol Up And Vol Down Simultaneously
A Blue Android System Recovery Menu Will
Appear
5) Press The Vol Up / Vol Down Keys To
Highlight "Wipe Data/Factory Reset" Then Press
The Power On Key To Select.
The Phone Will Now Clear The Data To Factory
Reset Which Takes About A Minute.

Add caption
Key Features
4.3inch Super AMOLED Advanced qHD (540 x
960) touch screen
Effects: Normal, Black and White, Negative, Sepia
Scenes: Auto, Portrait, Landscape, Night Portrait
Modes: Single Shot, Multi shot, Timer, HDR
Adjustable Exposure
VGA Front facing camera
Andriod Operation System
Full 1080p HD video recording
Internal 1GB RAM, 8GB ROM
5.0GB user available internal memory,
expandable with optional microSD card

How To Hard Reset Asus Zenfone 5 RemovePattern Lock

How To Hard Reset Asus Zenfone 5 Remove Pattern Lock
Asus Zenfone 5 Hard Reset Solution
How To Hard Reset Asus Zenfone 5
How To Remove Pattern Lock From Asus Zenfone 5


Please Make A Backup Before Hard Reset
Otherwise Data Will Be Lost.
1. Switch off the ASUS ZENFONE 5 Mobile
Phone
2. Click and Hold jointly: Power Key + Volume
level Up Key for several secs until text
selection show up, then launch both key
3. At this text selection menu, select Recovery
and proceed with click Power Key to verify or
Acceptable
4. Wait around until the Liquid crystal display of
ASUS ZENFONE 5 Mobile Phone will show the
Android operating system Company logo,
proceed click jointly Volume level up key +
Volume level Down jointly then we will see
Android operating system Recovery Method
5. Follow the selection menu at Liquid crystal
display screen to proceed Factory Reset the
hard reset ASUS ZENFONE 5, use Volume
level Up or Volume Down to get around the
Menu and click Power Key to OK or Get into.

Wednesday, June 4, 2014

LG Optimus L9 II D605 Hard Reset Keys

LG Optimus L9 II D605 Hard Reset Keys
How To Hard Reset LG Optimus L9 II   D605
LG Optimus L9 II D605 Hard Reset Pattern Lock  Solution


When you need to do a Hard Reset?
You can apply this operation in many cases, We
will mention some of them here:\
- After installing bad or unsupported application
into your Samsung mobile phone which causes
your phone to be frozen.
- Your Samsung mobile phone doesn't respond
to any order after booting because of some
software errors.
- Forgotten pattern lock in Samsung Android
mobile phones.
- Forgotten user code.
- Forgotten phone code.
- Before or after installing new firmware updates
into your device.

How To Hard Reset:
Note! All Data Will Be Lost!
1.Power Off Your Phone
2.Press Together Volume Down + Power Key
3.Press Power Key To Erase All Data
4.Press Power To Confirm
5.Wait Until The Phone Restarts

Samsung Galaxy S3 I9300 Hard Reset RemovePattern Lock

Samsung Galaxy S3 I9300 Hard Reset Remove
Pattern Lock
How To Hard Reset Samsung Galaxy S3 I9300
Samsung Galaxy S3 Pattern Lock Solution


If You Forgot Your Unlock Pin Code Just Follow
These Steps To Reset Your Phone.
1.Powe Off Your Phone
2.Push Together Volume Up + Home Button +
Power Key
3.Select With Volume Keys "Wipe Data/Factory
Reset" And Push Power To Confirm
4.Select "Yes"
5.Wait Until Format Ends
6.Push Power Key To Confirm "Reboot"
7.Wait Until The Phone Restarts
Done :)

 L
Product Features:
3G, Wi-Fi, HDMI, NFC
Quad Core, 1.4 GHz Processor
1 GB RAM
16 GB inbuilt memory
4.8 inches, 720 x 1280 px display
8 MP Camera with flash
Memory Card Supported, upto 64 GB
Android, v4.0.4 (upgradable to v4.3)

Saturday, May 31, 2014

Nokia Asha 210 Insert Sim Problem Jumper

Nokia Asha 210 Insert Sim Solution
Nokia 210 Sim Connecter Ways Jumper
Asha 210 Insert Sim Problem

The only problem you will encounter under the
banner of Nokia Asha 210 SIM card problem is
the insert SIM message. If you are not getting
network signals in your Asha 210 then it is the
network problem.
Here is the manual and hardware solution of

Nokia Asha 210 SIM Card problem:
Manual Solution
Restart your phone and check.
If the above step doesn’t work
then remove, clean and reinsert
your SIM Card and check.
Check with any other good and
working SIM card.

Hardware Solution
Check out the given pic
If you have further Questions please don’t
hesitate to leave a comment.
Note: Every diagram we post on gaurav-mobile.blogspot.com
is tested by one or more members of our team.
Still Use them at Your Own Risk we are not
responsible if these solutions may cause any
harm to your phone.

How To Hard Reset Intex Aqua i4+

Intex Aqua i4+ Hard Reset Solution
How To Remove Pattern Lock From Intex Aqua i4+
Intex Aqua i4+ Factory Reset
Performing a hard reset will remove ALL data
including the Google account, system data,
application data, application settings, and
downloaded applications. Only perform this reset
if absolutely necessary.
Note: disable Automatic
restore prior to performing a hard (factory) reset
when attempting to determine whether a 3rd
party application is the cause of an Operating
System / Application issue.

How To Reset:
- Turn your device off.
- Take out any existed SIM or memory card.
- Wait for 10 seconds.
- Press and hold the Volume Up key then press
the Power key.
- Keep pressing the key until Android appears.
- Use the Volume Down key to select Wipe Data /
Factory Reset option.
- Use the Power key to confirm the operation.
- You need to use the Volume Down key again to
select "Yes -- delete all user data"
- Use the Power key to confirm.
- After performing the hard reset, Select Reboot
System Now option, And confirm it using the
Power key.
- Now the phone will reboots, Wait for it to be
fully on and then you can start using it.

Notice: The Hard Reset / Factory Reset operation
will delete anything that are saved in your
phone's internal memory, So make a backup of
your data in case you can access them.

How To Root Nokia X Android Simple Method

Nokia X Android Root Solution


How to root nokia x root nokia x by vroot tool


Disclaimer : During the process of rooting, there
is always a risk for you to brick your Android
device. So if you choose to root your device, you
are doing it at your own risk! Your device
warranty will also be voided after rooting.


Prerequisites before you begin rooting Nokia x
1. Vroot is available only to Windows-based PC.
So make sure you have a Windows PC before
moving on.
2. Download the vroot program to your PC.
3. Make sure you have installed the necessary
device driver before moving on. If you have
not do so, you can head down to nokia
support page and download the necessary
device driver before moving on.
4. Make sure you have enabled USB Debugging
from your device’s settings.
5. Make sure you have at least 80% battery
remaining you on your device.
6. Back up the smartphone.


Follow the steps below on how to root Nokia X
1. Install vroot on your PC by double-clicking on
its icon.
2. Open the vroot program on your PC.
3. Connect the Nokia X to your PC via a USB
cable.
4. Your PC should be able to detect your
smartphone once its being connected.
5. use vroot to root NOkia x On the program,
click on the ROOT button ( Green button ) to
begin rooting the device.
6. You’ll be prompted by the program once it
has rooted your device.
7. Your smartphone should automatically be
rebooted.


VRoot New English Ver 1.7.6 Download
Congratulation! You’ve just rooted Nokia x!
Now, you’re free to install custom ROMs as well
as recovery on the nokia x. In the meantime,
stay tune for more how to root tutorials!


Samsung Galaxy S5 Hard Reset Solution

Samsung Galaxy S5 Pattern Lock Problem
How To Hard Reset Samsung Galaxy S5
Samsung S5 Hard Reset Keys
Samsung Galaxy S5 Hard Reset 
Samsung S5 Factory Reset Method is Here.

If you execute a hard reset, all customer apps and
user files will be removed.
Please don’t forget to backup any critical files
just before executing a hard reset. Galaxy S5
forgotten security password.

How To Hard Reset----
Remember! All Data Will Be Lost, So Make A
Backup Before!
1.Power Off Your Phone
2.Press Together Volume Up + Home Key +
Power Button
3.Select With Volume Keys "Wipe Data/Factory
Reset" And Press Power To Confirm
4.Select "Yes" And Press Power To Confirm
5.Wait Until Format Ends
6.Push Power Button To Confirm "Reboot"
7.Wait Until The Phone Restarts